 |
| |
 |
| |
|
|
| Settings |
|
| In this section
I will go through all of the settings for ElementalFX and what
they do. It is somewhat important to understand how all of these
settings work, otherwise the changes you make to settings may
cause seemingly random and unpredictable results. |
|
| Download
PDF documentation (97k) |
|
| The Component Inspector |
|

The presets panel is pretty self explanitory. You select
a preset from the combobox and it is applied. Be warned,
the preset is applied immediately, so any settings you
may have changed are lost. Save stores your current
settings in a preset named whatever is currently in
the combo box. You can change the names of the presets
at any time simply by typing the new name for the currently
selected preset in the combo box.
Import is disabled because I'm still working out a
good cross-platform way to let you easily import new
presets. Export works, but all it does is print the
particle settings to the output window in the appropriate
format. You can cut and paste the settings into a text
file or use it to easily post settings on a web site,
etc. These will be fully functional by v2.5, but since
I'm working on this in my spare time, that may be a
while.
|
| 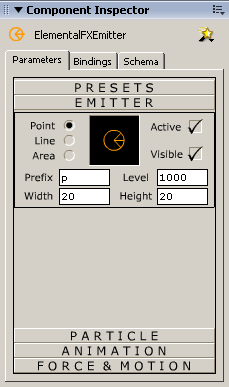 Emitter
Type: The radio buttons allow selection between
emitter types. The difference between emitter types
is as follows: Emitter
Type: The radio buttons allow selection between
emitter types. The difference between emitter types
is as follows:
Point - Emits
particles in a stream from a single x,y position on
the stage.
Line - Emits
particles from random positions along a line, which
will be shown on the stage at design time by an orange
line extending the width of the emission area.
Area - Emits
particles from random positions within a given area,
which is shown at design time by an orange bounding
box surrounding the emission area.
Active: Whether or not the emitter
is currently active. You can keyframe animate this component
by turning the emitter on and off to synchronize particle
effects to events in your movie.
Visible: Whether or not the emitter
is visible when the movie is published. Leaving the
emitter visible can be beneficial during development
for precise placement, but this allows you to make the
emitter visible during development and invisible when
you publish.
Prefix: This is the first letter of
the name of each of the particle instances created,
for example: p1, p2, p3, p4, etc. The purpose for this
control is to allow you to change the name of the particles
generated by different instances of the component on
the stage, so that there are no naming conflicts when
layering multiple emitters for an effect.
Level: Similar to the prefix setting,
this allows you to have different emitters running on
the stage at the same time without having depth conflicts.
Because there are more than 65k levels available in
Flash, I generally set the level to 1000, and then don't
place anything between 1000-1999 to be safe, but realistically
you will never be able to generate 1000 particles without
seriously slowing down any computer that tries to play
it back.
Width/Height: This is the width and
height attribute of the bounding box for the line and
area emitters. My plan was to let you set the width
and height by scaling the emitter on the stage, but
the MX 2004 live preview made that almost impossible,
so this is what you get instead. |
| 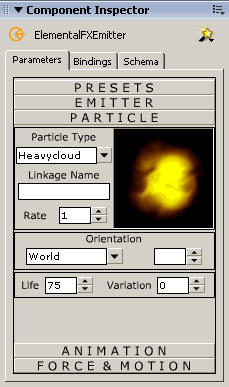 Particle
Type: This is the list of available particle
types. Still no luck with the real-time SVG import (SVG
files are big), so while I'm working
out a way to do this properly, you're stuck with my
built in particle types or any movie clip in the library
with an export name. To use your own artwork, convert
it to a movie clip and set it to export on the first
frame. In the particle types combobox, select "Custom
Particle" and then type your particle's export
name into the Linkage Name box. Particle
Type: This is the list of available particle
types. Still no luck with the real-time SVG import (SVG
files are big), so while I'm working
out a way to do this properly, you're stuck with my
built in particle types or any movie clip in the library
with an export name. To use your own artwork, convert
it to a movie clip and set it to export on the first
frame. In the particle types combobox, select "Custom
Particle" and then type your particle's export
name into the Linkage Name box.
Rate: This is the rate at which particles
are spawned, per frame. Always start with one, because
if you have 10 particles spawning per frame, and they
live for 100 frames, you may have as many as 1000 particles
on the stage at once, which will cause flash to run
very slowly.
Orientation: This is the orientation
(starting rotation) of the particle. The possible settings
are:
- World - Default, and probably the
setting you will use most often. Aligned to the stage.
In other words, the particle will face the direction
the artwork faces.
- Emitter - This aligns the particle
to the emitter, so if the emitter has been rotated
90 degrees, the particles will spawn rotated 90 degrees.
- Random - This starts each particle
at a random rotation, which is useful for giving the
illusion of each particle being different.
- Arbitrary - This setting allows
you to manually enter an orientation, in the spinner
box next to the combo box. This is for cases when
the artwork was generated facing one direction, but
needs to face a different direction as a particle.
Possible values are 0-360.
Life: This is the number of frames
the particle will live. You generally want the particles
to live only as long as absolutely necessary, for example
until they pass off the stage or until their opacity
fades to 0. Remember, the longer they live, the more
particles you will have on the stage at one time, which
is the main cause of frame rates dropping.
Life Variation: This setting allows
you to introduce randomness to the life attribute. It
is a percentage, so a value of 25 would mean that the
life setting may vary by +- 25%. Be warned, using life
variation may cause particles to die unexpectedly, as
new particles overtake their names or depths. |
| 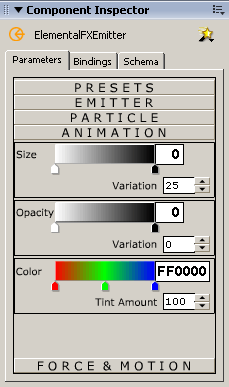 The
following controls are custom components I built specifically
for ElementalFX. The gradietns represent the life of
the particle, from 0% (birth) at the left to 100% (death)
at the right. The gradient between shows the variation
in size across time. In the image to the left, the size
setting has a value of "100% at birth, gradually
scaling down to 0% at death". I found that this
kind of value was too difficult to express with numbers
in a settings panel, so I created these gradient controls
(remenicsent of discreet Combustion) to simplify the
settings. The
following controls are custom components I built specifically
for ElementalFX. The gradietns represent the life of
the particle, from 0% (birth) at the left to 100% (death)
at the right. The gradient between shows the variation
in size across time. In the image to the left, the size
setting has a value of "100% at birth, gradually
scaling down to 0% at death". I found that this
kind of value was too difficult to express with numbers
in a settings panel, so I created these gradient controls
(remenicsent of discreet Combustion) to simplify the
settings.
Size: Size of the particle over time,
in percent (0-100).
Size Variation: Percent variation
in size.
Opacity: Opacity (alpha) of the particle
over time, in percent (0-100).
Opacity Variation: Percent variation
in opacity.
Color: This is the color (for vectored
particles, using setRGB) or tint (for rastered or custom
particles using setTransform) of the particle over time.
In the example to the left, the particle will start
as red, gradually turning green by it's half-life, and
then gradually to blue before it dies.
Tint Amount: This was one of the more
complex features to implement, but one of the least
useful at this time. In Flash terms, this is like setting
the % in the movie clip tint dialog, only all three
(R,G,B) values are set to the same percentage, which
is what makes it difficult to use right now. In my next
point release I will put seperate R, G, and B Amount
boxes in there, allowing you greater control over how
the artwork is tinted, as well as seperate R, G, and
B color values (0-255) instead of a single hex value.
This will afford greater flexibility in tinting particles,
and since I've already done the hard part, it will be
an easy feature to add. In the mean time, my suggestion
is to leave it at 0 (do not tint the particle at all)
or 100 (tint the particle with the color specified). |
| 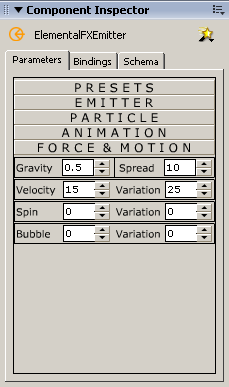 Gravity:
This is exactly what it sounds like, downward
force applied according to physics. The scale is rather
arbitrary, so some experimentation is necessary to find
exactly the right setting for your scene. Gravity:
This is exactly what it sounds like, downward
force applied according to physics. The scale is rather
arbitrary, so some experimentation is necessary to find
exactly the right setting for your scene.
Spread: This is the amount of random
spread in the emission pattern, in degrees. At 0 the
particles will all be emitted at exactly the same angle,
directly out from the emitter. At 15, you get a 15 degree
cone of emission, meaning the particles will be emitted
at a random angle within 15 degrees of center. At 360,
particles will be emitted in every direction.
Velocity: This is the "speed"
at which the particles are emitted.
Velocity Variation: Percent variation
in velocity.
Spin: This setting causes the particles
to rotate on their center. The setting is in degrees
and is randomized in direction (clockwise or counter-clockwise).
Spin Variation: Percent variation
in spin.
Bubble: This is bubble motion, or
a horizontal waveform applied to the motion of the particles.
The bubble setting defines the amplitude of the wave,
so at a low setting (1 or 2) you will get fast moving,
jiggly bubles, while at a higher setting you will get
bubbles that slowly sway back and forth. This is useful
for both bubbles underwater and snow falling.
Bubble Variation: Percent variation
in bubble amplitude. |
|
|
| The Stage |
|

Point Emitter |

Line Emitter |

Area Emitter |
|
To the right are examples of how
each emitter will look on the stage. As you adjust
the width and height settings in the Emitter Panel
the appearance on the stage should adjust to reflect
the change. DO NOT RESIZE THE EMITTER ON
THE STAGE. First, it doesn't do anything,
the particles are emitted based on the width and
height settings, not on the size of the component
on the stage. The only purpose the emitter serves
is to set an initial x and y position and sometimes
a starting rotation for particles to be emitted
based on. Second, if you have the emitter set to
visible, it will be stretched according to how you've
stretched the component. So there's nothing to be
gained from sizing the emitter, and while there's
nothing substantial to be lost, it does make it
look funny and hard to judge the position of 0,0
for the emitter. |
|
|
|
| The Code |
|
| There is
really only one method that the emitter exposes, called
KillAllParticles(). It basically does what it says,
which is destroy all the particles belonging to a particular
emitter. This is necessary because the particles live
independantly of the emitter, so simply taking the emitter
off the stage does not kill the particles, they will
continue to live and move until they reach the end of
their life or until the KillAllParticles method of their
emitter has been called. The usage is as below.
| EmitterName.KillAllParticles(); |
|
|
|
| Bugs & Unusual
Behavior |
|
- Non-Unique Instance Names Share Settings-
If two emitters have the same instance name,
then they apparently share an XCH object (which Flash
uses to pass data between a custom ui, live preview
movie, and the run-time component), which basically
means they share the same settings. Any changes made
to an emitter will affect all other emitters with
the same instance name. When a component doesn't have
an instance name, it actually still has one but it
is an automatically generated name like "instance01",
"instance02", etc, which keeps this problem
from showing up. But if you name your instances, make
sure you give them unique names.
All Live Previews Use The Current Settings
- Apparently, the live preview of all components of
the same type assume the properties of the one that
is currently selected, which has something to do with
the XCH object. So if you have a point emitter and
an area emitter on the stage at the same time, and
the point emitter is selected, they will both look
like point emitters in the live preview. But then
if you select the area emitter, they will both turn
into area emitters with the same width and height.
So far I have been unable to find a way to keep this
from happening. However, it doesn't affect the performance
of the particle system, only the appearance of the
live preview for all particle emitters on the stage
at the time. If anyone has any ideas about how to
overcome this little "feature" I would love
to know about it.
|
- Preset List Fonts Shrink/Preset List Is
Acting Whacky - That is because those are
home made, super-light listboxes that I made (inline,
not as a component) specifically for the custom UI
for this component. I'm improving these listboxes
with each release, but there are still some bugs that
show up in the Preset listbox. I had to roll my own
because when I tried to use the MM listbox component,
my custom ui ended up being something like 300k, and
took over 10 seconds to load when you selected an
instance of the component on the stage. I obviously
couldn't have that, so I built a listbox from scratch
with the absolute minimum functionality in order to
save on file size. They honestly aren't even listboxes,
they're ultra-light hacks that sort of look and act
like listboxes. : )
|
|
|
|
|